Drupal

Improving ‘time to first load’ and generating critical CSS for Drupal and WordPress sites

This document is a work in progress….

One thing that we want to fix is ‘time to first load’. As you probably know, people are recommending to put as little in the way of initial loading as possible, and zero external requests. This means no blocking JS in head, and as little CSS as possible, placed inline instead of in an external file – the so-called ‘critical.css’

Our situation was very much the opposite. Most of our sites are on Drupal or WordPress, with quite a few plugins, which generate a lot of CSS and JS. For wordpress, we often use a theme called Divi, which is quite powerful, but it generates a LOT of css and js, and a lot of it we don’t need.

We started by working on CSS, and then moving onto JS.

CSS

  • Using a web inspector, like Firebug or Safari’s developer tools, take a look at your <head> element. Copy all of the internal CSS files and inline CSS you see there into a single stylesheet (External css, like webfont importing, leave for the moment). If a css file has an @import statement from another file, you have to replace the @import statement with the contents of that file. For example – our WordPress main theme style.css has an import statement from Divi style.css. You will now have a VERY big single css file – lets call it style1.css
  • There are some tools you can use to make the CSS file a bit more manageable. I would recommend first to use a tool like CSS Compressor with Moderate settings so that the file is still readable.
    Then, as much as you can, you can set about removing unused css and combining ‘duplicate’ and overriding css statements that were formerly in different files. You dont need to aim for absolute precision here; if you are not sure about some css, you can just leave for later. This applies especially if you are not familiar with the theme. There are some command line tools and paid online tools that can help you with removing unused and duplicate CSS.
  • Now that you have a single file, you can use a free critical css generator, which will generate some critical css. You should save this into a seperate file called critical.css
  • Then you remove all of the css out of style1.css that is already inside critical.css. Diffmerge for Mac helped with this: you can export a ‘diff’ which unfortunately contains some extra characters but you can remove with search/replace. This file is now your new style1.css.

Now we want to put the contents of critical.css inline in the header, and place style1.css in the footer just before all the footer js, and remove all of the other CSS.

  • In WordPress, you can disable all theme CSS in your function.php file: See this solution on stack overflow (Note: we may need to modify this for logged-in users). You can then override the header.php file in your theme, and add a php include statement for the critical.css file just above wp_head() to load the contents directly
    <style type="text/css"><?php include get_stylesheet_directory() . '/.critical.css'; ?></style>
    Note that if you have an external CSS like webfont, for now it is good to just place there manually.
    Then you should place the style css file manually in your footer.php file just above wp_footer. It is probably best to rename this to style.css and make it your theme style file, complete with theme info on top.
    <link rel="stylesheet" href="<?php include get_stylesheet_directory() ?>./style.css" type="text/css" media="all">
  • In Drupal 7 you can also disable css in your theme template.php file, and load certain css for admins

/* Unset all the base drupal stylesheets */
function themename_css_alter(&$css) {
global $user;
$admincss = array(
drupal_get_path('module', 'user') . '/user.css',
drupal_get_path('module', 'contextual') . '/contextual.css',
drupal_get_path('module', 'ckeditor') . '/css/ckeditor.css',
drupal_get_path('module', 'admin_menu') . '/admin_menu.css',
drupal_get_path('module', 'admin_menu') . '/admin_menu.uid1.css',
drupal_get_path('module', 'domain_admin') . '/domain_admin.css'
);
$temp = $css;
foreach($temp as $key => $data) {
if(!$user->uid || !in_array($key, $admincss)) {
unset($css[$key]);
}
}
Then you can override html.tpl.php and paste the critical css file above the $styles variable.

<style><?php include drupal_get_path('theme', 'yourtheme') . '/critical.css'; ?></style>

and the style css file at the bottom above the $page_bottom variable

<link rel="stylesheet" href="<?php include drupal_get_path('theme', 'yourtheme') ./style.css" type="text/css" media="all">

Cleaning up icon fonts

Some themes (eg wordpress Divi) has its own icon font or import a common font, which is pretty big! We should use fontello to create our own much smaller font based on the icons you actually use and import this one instead.

Javascript

more to come…

Delete inactive Drupal users – sql query

Delete users who have no role assigned, created no content and who have not logged in in a few years:

DELETE u.* FROM users u LEFT JOIN users_roles r on u.uid = r.uid LEFT JOIN node n ON u.uid = n.uid WHERE r.rid IS NULL AND n.nid IS NULL AND u.login < 1400000000 AND u.uid > 1;
DELETE a.* FROM authmap a LEFT JOIN users u ON a.uid = u.uid WHERE u.uid IS NULL;

Export all 404 errors stored in Drupal database log

A drush command to export a text file with all 404s on your site and how often they occur:

drush sql-query "SELECT count(*) as num_rows, message from watchdog WHERE type = 'page not found' group by message order by num_rows desc;" --result-file=404s.txt

Drupal Views: selecting number of items via argument

Steps to reproduce:
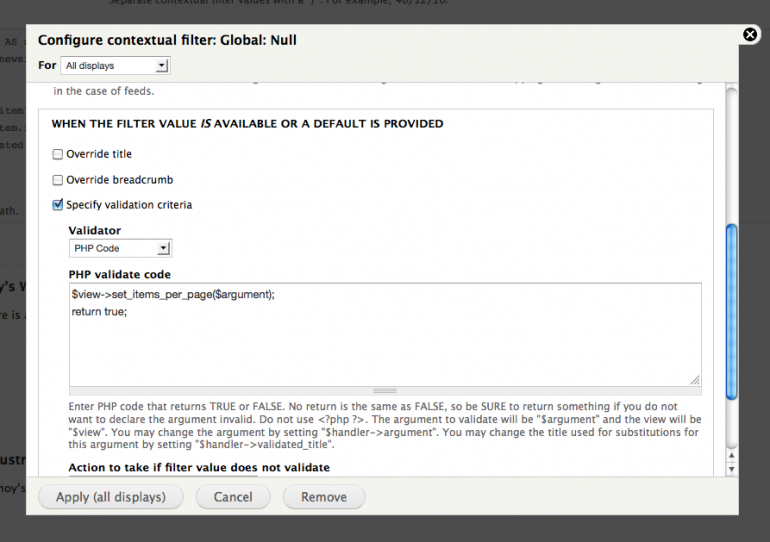
1. Add argument Global:Null (it might work with other arguments as well, but this seemed the least intrusive)
2. Go to ‘Specify validation criteria’ select ‘php code’ and add this:

$view->set_items_per_page($argument);
return true;

You don’t need to change anything else in the argument – however in the ‘More’ section it might be useful for future reference to change the argument name from ‘Global: Null’ to something like ‘Number of items’

This is especially useful for views you would like to include in nodes using the Viewfield or Insert View module, where you would like editors to be able to add views with the number of items they want without having access to the view structure.

WordPress-like summaries and Teasers in Drupal 7 and CKEditor

Over the past few versions of Drupal, there have been quite a few attempts to create a good way of creating page summaries/teasers/excerpts/extracts that you can use on the front page to encourage people to read the article.

The version that comes out of the box with Drupal 7 works quite nicely if no text editors are added, but our editors have found it rather confusing when used in combination with an editor like CKEditor. When a summary is included and selected, 2 text editors suddenly pop up on the page!

So we have been looking for ways to make the experience a little easier for people.

A good template to follow in this regard is WordPress. They have 2 different ways of creating summaries:

1) A ‘post excerpt’ field, which is good for 1-line summaries to be used in sidebar blocks and so forth. We will call this the short summary.

2) A ‘break’ button which you can press to separate the first couple of paragraphs from the rest (we will call this the long summary). This is good for a main blog page, to let people read the first couple of paragraphs, and then press ‘read more’ to read the rest.

We will try to emulate that here.

Out of the Box steps

So these are steps you can take without having to resort to code. They’ll take you 90% of the way there.

1. Disable the ‘Add/edit summary’ link

Go to Structure » Content types and click the ‘Manage fields‘ link for the content type. Edit the Body field and uncheck “Summary input”.

2. Add the Drupal break button in CKEditor

Go to Configuration » Content authoring » CKEditor. In the ‘Editor Appearance’ section, enable the ‘Drupal Break’ plugin, and add the button (a red dashed line) to the sidebar. This will enable ‘long summaries’ to be created.

3. Create a separate ‘Long text’ field for your ‘short summaries’

You can make this field ‘plain text’ input and limit it to 2 or 3 rows. You can then use this field in shorter Views listings to be placed in sidebars or on the front page.

After that, what’s left?

1. Views doesn’t recognise the <!–break–> tag. The CKEditor button inserts a <!–break–> tag to distinguish between the summary and the rest of the page. However, neither Views ‘trimmed’ or ‘summary or trimmed’ display modes recognise it, which is odd as Drupal’s default trimming does. So the trick here is to populate the node summary on node save:

/* Implements hook_form_node_form_alter(). */
function mymodule_form_node_form_alter(&$form, $form_state) {
// Not sure if we need this, if we have input disabled
$form['body']['und'][0]['summary']['#access'] = FALSE;

$form['#submit'][] = 'mymodule_node_form_submit';
}

function mymodule_node_form_submit(&$form, &$form_state) {
$form_state['values']['body']['und'][0]['summary'] = text_summary($form_state['values']['body']['und'][0]['value'], 3, 600);
}

The last 2 values of the text_summary function are the filter format ID (which should probably be the same as the ID of the body itself. ) and the trim length, which won’t matter in our case as text_summary first looks for the <!–break–> before doing any trims. With this addition, we can then use the long summary in our views, as the Body field in ‘Summary or trimmed’ mode.

2. The page break button is not as precise as we would like. The break button is quite careful not to break into things like divs (for fear of leaving unopened tags), but if youre using it on an old site with lots of legacy code (like we often are), this means that often when you press the break button, the <!–break–> tag ends up at the bottom of the page! Views has an option to close unopened tags, so we no longer need to worry about them in the plugin itself. So here’s a version of the CKEditor plugin that is less choosy about positioning, just replace the /plugins/drupalbreaks/plugin.js in the ckeditor module. Just make sure to close all tags in your views. Also try not to use it inside things like tables 🙂

/*
Copyright (c) 2003-2011, CKSource - Frederico Knabben. All rights reserved.
For licensing, see LICENSE.html or http://ckeditor.com/license
*/

/**
 * @file Plugin for inserting Drupal teaser and page breaks.
 */
( function() {
    CKEDITOR.plugins.add( 'drupalbreaks',
    {
        requires  : [ 'fakeobjects', 'htmldataprocessor' ],

        init : function( editor )
        {
                
            // Add the styles that renders our fake objects.
            editor.addCss(
                'img.cke_drupal_pagebreak,img.cke_drupal_break' +
                '{' +
                'background-image: url(' + CKEDITOR.getUrl( this.path + 'images/pagebreak.gif' ) + ');' +
                'background-position: center center;' +
                'background-repeat: no-repeat;' +
                'clear: both;' +
                'display: block;' +
                'float: none;' +
                'width: 100%;' +
                'border-top: #999999 1px dotted;' +
                'border-bottom: #999999 1px dotted;' +
                'height: 5px;' +
                '}' +
                'img.cke_drupal_break' +
                '{' +
                'border-top: #FF0000 1px dotted;' +
                'border-bottom: #FF0000 1px dotted;' +
                '}'
                );
                
            // Register the toolbar buttons.
            editor.ui.addButton( 'DrupalBreak',
            {
                label : Drupal.t('Insert Teaser Break'),
                icon : this.path + 'images/drupalbreak.png',
                command : 'drupalbreak'
            });

            editor.addCommand( 'drupalbreak',
            {
                exec : function()
                {
                    // There should be only one  in document. So, look
                    // for an image with class "cke_drupal_break" (the fake element).
                    var images = editor.document.getElementsByTag( 'img' );
                    for ( var i = 0, len = images.count() ; i < len ; i++ )
                    {
                        var img = images.getItem( i );
                        if ( img.hasClass( 'cke_drupal_break' ) )
                        {
                            if ( confirm( Drupal.t( 'The document already contains a teaser break. Do you want to proceed by removing it first?' ) ) )
                            {
                                img.remove();
                                break;
                            }
                            else
                                return;
                        }
                    }

                    insertComment( 'break' );
                }
            } );

            editor.ui.addButton( 'DrupalPageBreak',
            {
                label : Drupal.t( 'Insert Page Break' ),
                icon : this.path + 'images/drupalpagebreak.png',
                command : 'drupalpagebreak'
            });

            editor.addCommand( 'drupalpagebreak',
            {
                exec : function()
                {
                    
                    var hr = editor.document.createElement( '!--break--' ),
				range = new CKEDITOR.dom.range( editor.document );

			editor.insertElement( hr );

			// If there's nothing or a non-editable block followed by, establish a new paragraph
			// to make sure cursor is not trapped.
			range.moveToPosition( hr, CKEDITOR.POSITION_AFTER_END );
			var next = hr.getNext();
			if ( !next || next.type == CKEDITOR.NODE_ELEMENT && !next.isEditable() )
				range.fixBlock( true, editor.config.enterMode == CKEDITOR.ENTER_DIV ? 'div' : 'p'  );

			range.select();
			
                  /*   insertComment( 'pagebreak' );*/
                }
            } );

            // This function effectively inserts the comment into the editor.
            function insertComment( text )
            {
                // Create the fake element that will be inserted into the document.
                // The trick is declaring it as an 
, so it will behave like a // block element (and in effect it behaves much like an
). if ( !CKEDITOR.dom.comment.prototype.getAttribute ) { CKEDITOR.dom.comment.prototype.getAttribute = function() { return ''; }; CKEDITOR.dom.comment.prototype.attributes = { align : '' }; } var fakeElement = editor.createFakeElement( new CKEDITOR.dom.comment( text ), 'cke_drupal_' + text, 'hr' ); // This is the trick part. We can't use editor.insertElement() // because we need to put the comment directly at level. // We need to do range manipulation for that. // Get a DOM range from the current selection. var range = editor.getSelection().getRanges()[0], elementsPath = new CKEDITOR.dom.elementPath( range.getCommonAncestor( true ) ), element = ( elementsPath.block && elementsPath.block.getParent() ) || elementsPath.blockLimit, hasMoved; // If we're not in go moving the position to after the // elements until reaching it. This may happen when inside tables, // lists, blockquotes, etc. /*while ( element && element.getName() != 'body' ) { range.moveToPosition( element, CKEDITOR.POSITION_AFTER_END ); hasMoved = 1; element = element.getParent(); }*/ // Split the current block. if ( !hasMoved ) range.splitBlock( 'p' ); // Insert the fake element into the document. range.insertNode( fakeElement ); // Now, we move the selection to the best possible place following // our fake element. var next = fakeElement; //while ( ( next = next.getNext() ) && !range.moveToElementEditStart( next ) ) //{} range.select(); } }, afterInit : function( editor ) { // Adds the comment processing rules to the data filter, so comments // are replaced by fake elements. editor.dataProcessor.dataFilter.addRules( { comment : function( value ) { if ( !CKEDITOR.htmlParser.comment.prototype.getAttribute ) { CKEDITOR.htmlParser.comment.prototype.getAttribute = function() { return ''; }; CKEDITOR.htmlParser.comment.prototype.attributes = { align : '' }; } if ( value == 'break' || value == 'pagebreak' ) return editor.createFakeParserElement( new CKEDITOR.htmlParser.comment( value ), 'cke_drupal_' + value, 'hr' ); return value; } }); } }); } )();

Adventures in Drupal 7 Caching

(This post will be updated as we get a clearer idea of what is going on and how all the pieces fit together)

We have made quite a few sites in Drupal 7, the largest being http://www.srichinmoycentre.org. Drupal has evolved into a really powerful framework that can enable you to bring together all kinds of data in a variety of imaginative ways. However, you also need to know quite a bit about caching to get the site to load at speeds that people expect nowadays.

There are many different caching mechanisms that one can use with Drupal – this post aims to make clear how they can all fit together.

Out of the box caching mechanisms:

Page caching for anonymous users: This basically means that the entire page HTML is stored in the cache_page table in the database, and rendering the page requires just one trip rather than the multifarious queries normally required to build a page.

Block caching: If you enable this, then blocks will be cached for both anonymous and authenticated users. (Note that if you are not logged in and visit a page that has been cached for anonymous users, then the block content in that page will be cached no matter what – see this post). If you have a module that calls the hook_node_grants hook, then this is disabled to prevent people possibly seeing links in cached blocks to pages they shouldnt be seeing. However, this seems to be overriden by using the Drupal 7 block_cache_alter module (need to test this further). Note that block caches are flushed every time content is created or updated on the site – you can cache per page, role or user but there doesn’t seem to be much finesse in terms of minimum lifetimes etc.

Not out of the box

Views – Views can generate some pretty long queries, for example some of the queries mentioned above are querying 10 tables. So caching these are a must to have the site render quickly for authenticated users (as with block caching, the HTML output of these views are cached for anonymous users). For example, our feed displays have a caching lifetime of 1 hr, and many of our other content displays have a lifetime of 6 hours. Note that for block displays, Views offers options both for caching the view content and the surrounding block. We’re still evaluating in what cases this is useful and what other cases this could be counter productive (setting and flushing caches can be quite expensive processes)

Caching customised content – It is very easy to cache customised content using the cache_get and cache_set functions (for a very good guide, see here). You can set minimum cached lifetimes. As with views, we are still evaluating if it is a good idea to enable block caching for customised blocks whose content has already been cached in this manner.

Block cache alter – Right now, we are using it to cache the content of custom blocks. It seems to work straight out of the box in D7, even though we have modules with node access restrictions enabled (namely Domain Access). Right now we are mainly using it with user-created custom blocks (ie those using the block module).

Boost – This module creates static HTML pages and serves them instead of making Drupal/PHP/MySQL do the work. As of writing, the D7 version is workable and we are using it on several production sites. It seems to use some of Drupal’s native settings, so we’re still trying to see whats what there. It’s not yet as full featured as Drupal 6. I think the delay is bacause there is a push to try and integrate the settings into some kind of centralised caching API (see the pluggable caching section below) We have had issues with it on a few occasions, for example caching white screens (see this issue) In one instance on another site, I had to disable it because the cache wasnt being flushed effectively on node update. However, both those occasions we were using different hosting set ups to normal.

Pluggable caching

Drupal 7 has a pluggable caching backend. Basically what this means is that you can specify in your settings.php that instead of using Drupal’s database cache_* tables, the cache will instead be handled by another module. You can even configure different caching mechanisms to replace different cache tables.

Memcache/APC – Object based caching, which is faster then Database caching by many multiples. You can configure different modules to handle different caches – for example one recommended variant is to use APC to handle caches which do not change often like ‘cache’ and ‘cache_bootstrap’, Memcache to handle caches which can get large or change often like ‘cache_field’ and ‘cache_menu’ and leave Drupal’s database to handle ‘cache_filter’. These do require Mamcached/APC and their associated PHP PECL libraries to be installed on the server, but if you are on a managed VPS, your hosting people might do it for you.

Authcache – In its default state, this module will cache pages in the Drupal cache_page table for authenticated users just as the native caching does for anonymous users. However, this means pages will be served the same way for each role no matter what. Authcache offers a little bit of latitude to customise the user experience eg a special page variable to print the current user name. Right now we aren’t using it, as the D7 version hasnt yet developed a similar variable to print tabs.

You can use this module in combination with other cache backends eg memcache to speed up caching for authenticated users.